Data Intermediation Service Provider APIs
- Digital wallets into their applications.
- Consent management into their applications using digital wallets.
Step 1: Get the API Key
To obtain the API key, contact [email protected].
Step 2: Define a Data Agreement
During this step, data agreements are defined for any processing of personal data. This processing may involve exposing data as a data source (Issuer of the data) or consuming data as a data-using service (Verifier of the data). This can be achieved through a Data Protection Impact Assessment (DPIA) or a similar process to ensure robust data usage in compliance with applicable data regulations, such as GDPR.
Copy the code block below and execute the create data agreement API.
{
  "dataAgreement": {
    "id": "",
    "version": "",
    "controllerId": "string",
    "controllerUrl": "string",
    "controllerName": "string",
    "policy": {
      "id": "",
      "name": "",
      "version": "",
      "url": "",
      "jurisdiction": "",
      "industrySector": "",
      "dataRetentionPeriodDays": "",
      "geographicRestriction": "",
      "storageLocation": "",
      "thirdPartyDataSharing": true
    },
    "dataAttributes": [
      {
        "id": "",
        "name": "",
        "description": "",
        "sensitivity": "",
        "category": "",
        "restrictions": [
          {
            "credDefId": "H3DW1MUWZyBkP5LG4rTYRH:3:CL:80:default",
            "schemaId": "H3DW1MUWZyBkP5LG4rTYRH:2:Certificate Of Registration:6.0.0"
          }
        ]
      }
    ],
    "purpose": "string",
    "purposeDescription": "string",
    "lawfulBasis": "",
    "methodOfUse": "",
    "dpiaDate": "",
    "dpiaSummaryUrl": "string",
    "signature": {
      "id": "",
      "payload": "",
      "signature": "",
      "verificationMethod": "",
      "verificationPayload": "",
      "verificationPayloadHash": "",
      "verificationArtifact": "",
      "verificationSignedBy": "",
      "verificationSignedAs": "",
      "verificationJwsHeader": "",
      "timestamp": "",
      "signedWithoutObjectReference": "",
      "objectType": "",
      "objectReference": ""
    },
    "active": "",
    "forgettable": "",
    "compatibleWithVersionId": "string",
    "lifecycle": "draft",
    "dataExchange": {
      "dataExchangeProfile": "AIP10",
      "id": "string",
      "credentialDefinitionId": "string",
      "schemaId": "string",
      "isExistingSchema": true,
      "qrId": "string",
      "firebaseDynamicLink": "string",
      "presentationRequest": {
        "name": "string",
        "version": "string",
        "requestedAttributes": {
          "name": "string",
          "restrictions": [
            {
              "schemaId": "string",
              "credDefId": "string"
            }
          ]
        }
      }
    }
  }
}
Step 3: Integrate Data Wallet SDK
This step integrates the iGrant.io digital wallet SDKs into existing Android and iOS applications, enhancing them with decentralised application (dApp) capabilities and digital wallet functionalities.
- For Android: Go to Data Wallet (For Individuals) → Integrate Android SDKs and choose the Android tab option.
- For iOS: Data Wallet (For Individuals) → Integrate iOS SDKs and choose the iOS tab option.
Step 4: Integrate Consent Management (Privacy Dashboard) SDK
This step integrates the iGrant.io consent management (Privacy Dashboard) SDKs into existing Android and iOS applications, introducing privacy dashboard capabilities that enable individuals to exercise their rights under data regulations such as GDPR.
- For Android: Go to Consent Management → Integrate Android SDKs and choose the Android tab option.
- For iOS: Go to Consent Management → Integrate iOS SDKs and choose the iOS tab option.
Step 5: Implement DISP APIs
Establish connection with Cloud/Mobile wallets
The process of establishing a connection between wallets involves several key steps to ensure secure and efficient communication between an organisation and an individual. Here is a step-by-step overview of how this process operates using the iGrant.io platform:

Create Connection Invitation QR: Organisation A generates a QR code invitation. This code is designed to initiate a secure connection between the organisation Wallet and an individual's personal wallet.
Scan the QR Code or Use NFC: The individual scans the QR code or uses NFC (Near Field Communication) technology to respond to the connection invitation. This action triggers the process to establish a direct link between the two wallets.
Notify Connection Status: Once the connection is successfully established, Organisation A is notified of the connection status through a webhook event. This notification confirms that the individual’s wallet is now securely connected to the organisation Wallet, allowing for subsequent data transactions or interactions as defined by the organisation's protocols.
This workflow provides a secure and streamlined method for individuals to connect their digital wallets with organisations, facilitating trusted exchanges and interactions within the iGrant.io ecosystem.
Following APIs are available to intiate a connection as per DIDComm protocol:
Create connection invitation QR code: This is used to send connection invitation from one wallet to another wallet using DIDComm protocol. For individual wallets, when the QR code is scanned, the connection invitation request is sent to the requesting wallet.
Receive connection invitation: This is used to receive connection invitation from another wallet. E.g. a data wallet (individual) can scan a QR that contains this using DIDComm protocol.
Issue/expose data to a connection (Data Source)
The process of issuing (or exposing) data to a connection allows organisations to securely manage credentials issuance workflow with data consents. This workflow is designed to be both secure and compliant with regulatory requirements. Here is a step-by-step overview:
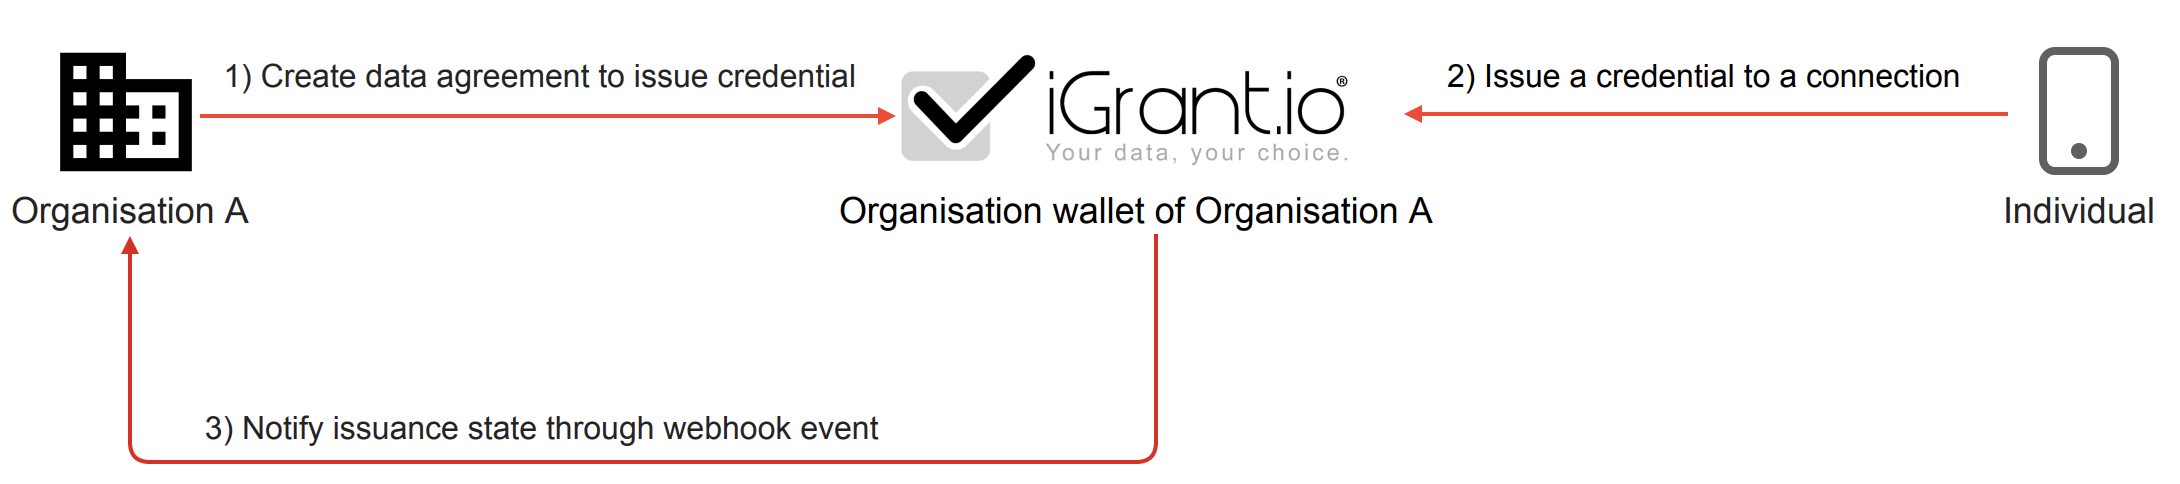
Create Data Agreement to Issue Credential: Organisation A initiates the process by creating a data agreement. This agreement outlines the terms under which credentials are issued as per ISO27560, ensuring all actions comply with relevant data protection laws and organisational policies. This data agreement could be formulated based on a Data Protection Impact Assessment (DPIA) and follows the framework defined in this IEEE paper.
Issue a Credential to a Connection: Based on the data agreement, Organisation A issues a credential directly to an individual's wallet. This step is facilitated through a secure connection that ensures data integrity and privacy.
Notify Issuance State Through Webhook Event: Upon successful issuance of the credential, Organisation A is notified through a webhook event. This notification confirms the successful transmission and acceptance of the credential, allowing for real-time updates and further action if required.
This streamlined workflow enables organisations to efficiently manage the distribution of digital credentials, enhancing user trust and compliance with data governance standards.
As a Data Source (or Data Producer or Issuer), following APIs are available to issue a credential:
- Create data agreement with data exchange profile: This creates a credential definition for credential issuance.
- Issue credential: Used to issue credential to a connection based on the data agreement.
Verify/consume data from a connection (Data Using Service)
The process of verifying (or consuming data) from a connection allows organiations to manage consume data workflow with digital wallet based verifications. Below is a detailed step-by-step overview:
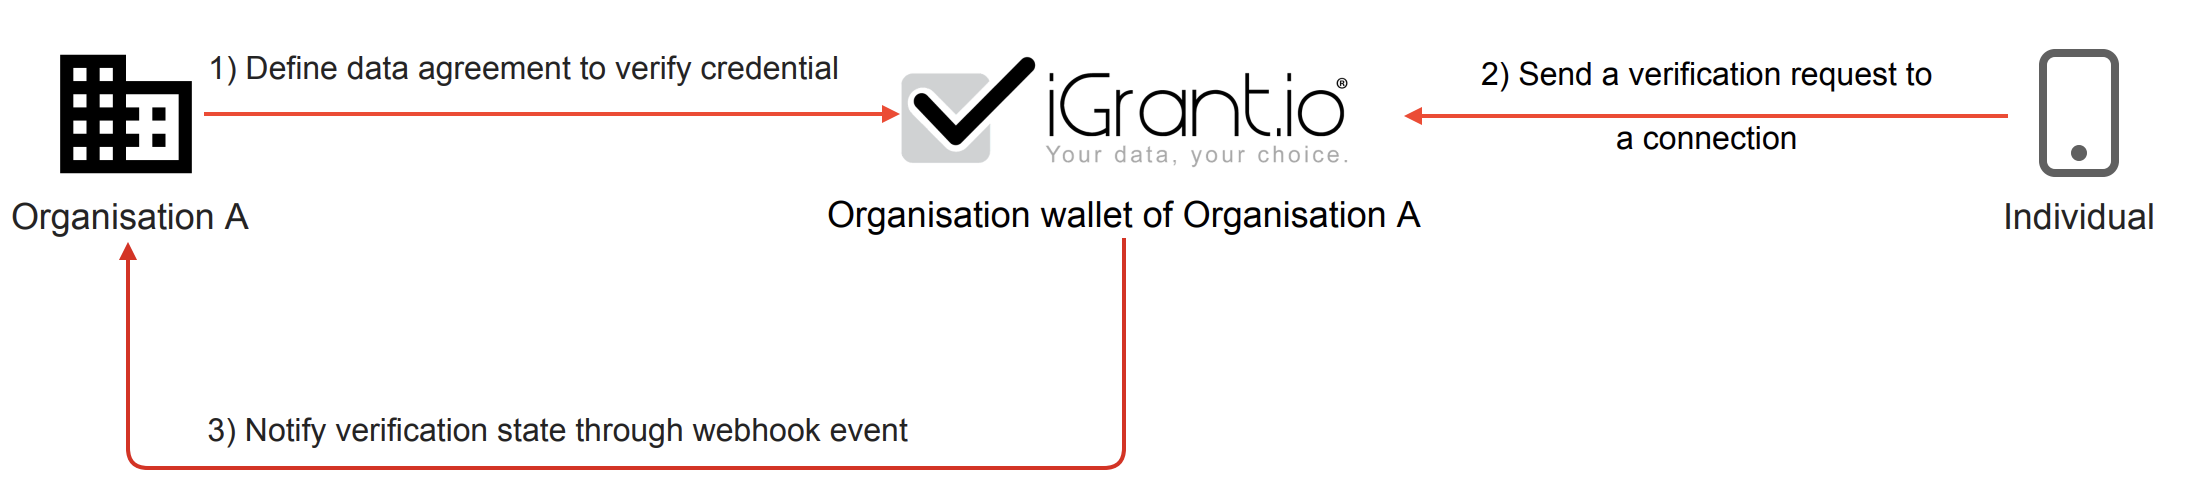
Define Data Agreement to Verify Credential: Organisation A sets up a data agreement that stipulates the criteria under which credentials will be verified. Here, the data agreement policy is based on ISO27560 standards and can use any of the lawful basis of processing including consent. This ensures that all actions to consume personal data comply with relevant data protection laws and organisational policies. This data agreement could be formulated based on a Data Protection Impact Assessment (DPIA) and follows the framework defined in this IEEE paper.
Send a Verification Request to a Connection: Subsequent to the agreement, Organisation A sends a verification request to an individual’s connection. This step involves securely querying the individual's wallet to verify the credentials it holds.
Notify Verification State Through Webhook Event: Upon completion of the verification process, Organisation A receives a notification via a webhook event. This alert signifies whether the verification was successful, enabling the organisation to proceed with data-related decisions based on verified credentials.
This streamlined verification workflow allows organisations to efficiently validate and consume data, enhancing the security and reliability of digital interactions within the iGrant.io ecosystem.
As a Data Using Service (or Data Consumer or Verifier), following APIs are available to verify credentials:
- Send verification request: This is used to send verification request to an existing connection.
- Create verification QR code: This is used to generate QR codes that can be used to request presentation from another wallet, e.g. an individual or cloud based wallet. For individual wallets, when the QR code is scanned, the presentation request is sent to the requesting wallet.