Payment Authenticator
This workflow implements European Wallet Consortium (EWC) RFC007, as specified by the EWC Payment Task Force.
It uses the OpenID4VCI Dynamic Credential Request protocol to issue a Payment Authenticator by authenticating the user with an identity document (e.g., PID, Passport, etc.). The following steps outline the process using OpenID4VCI as illustrated below:
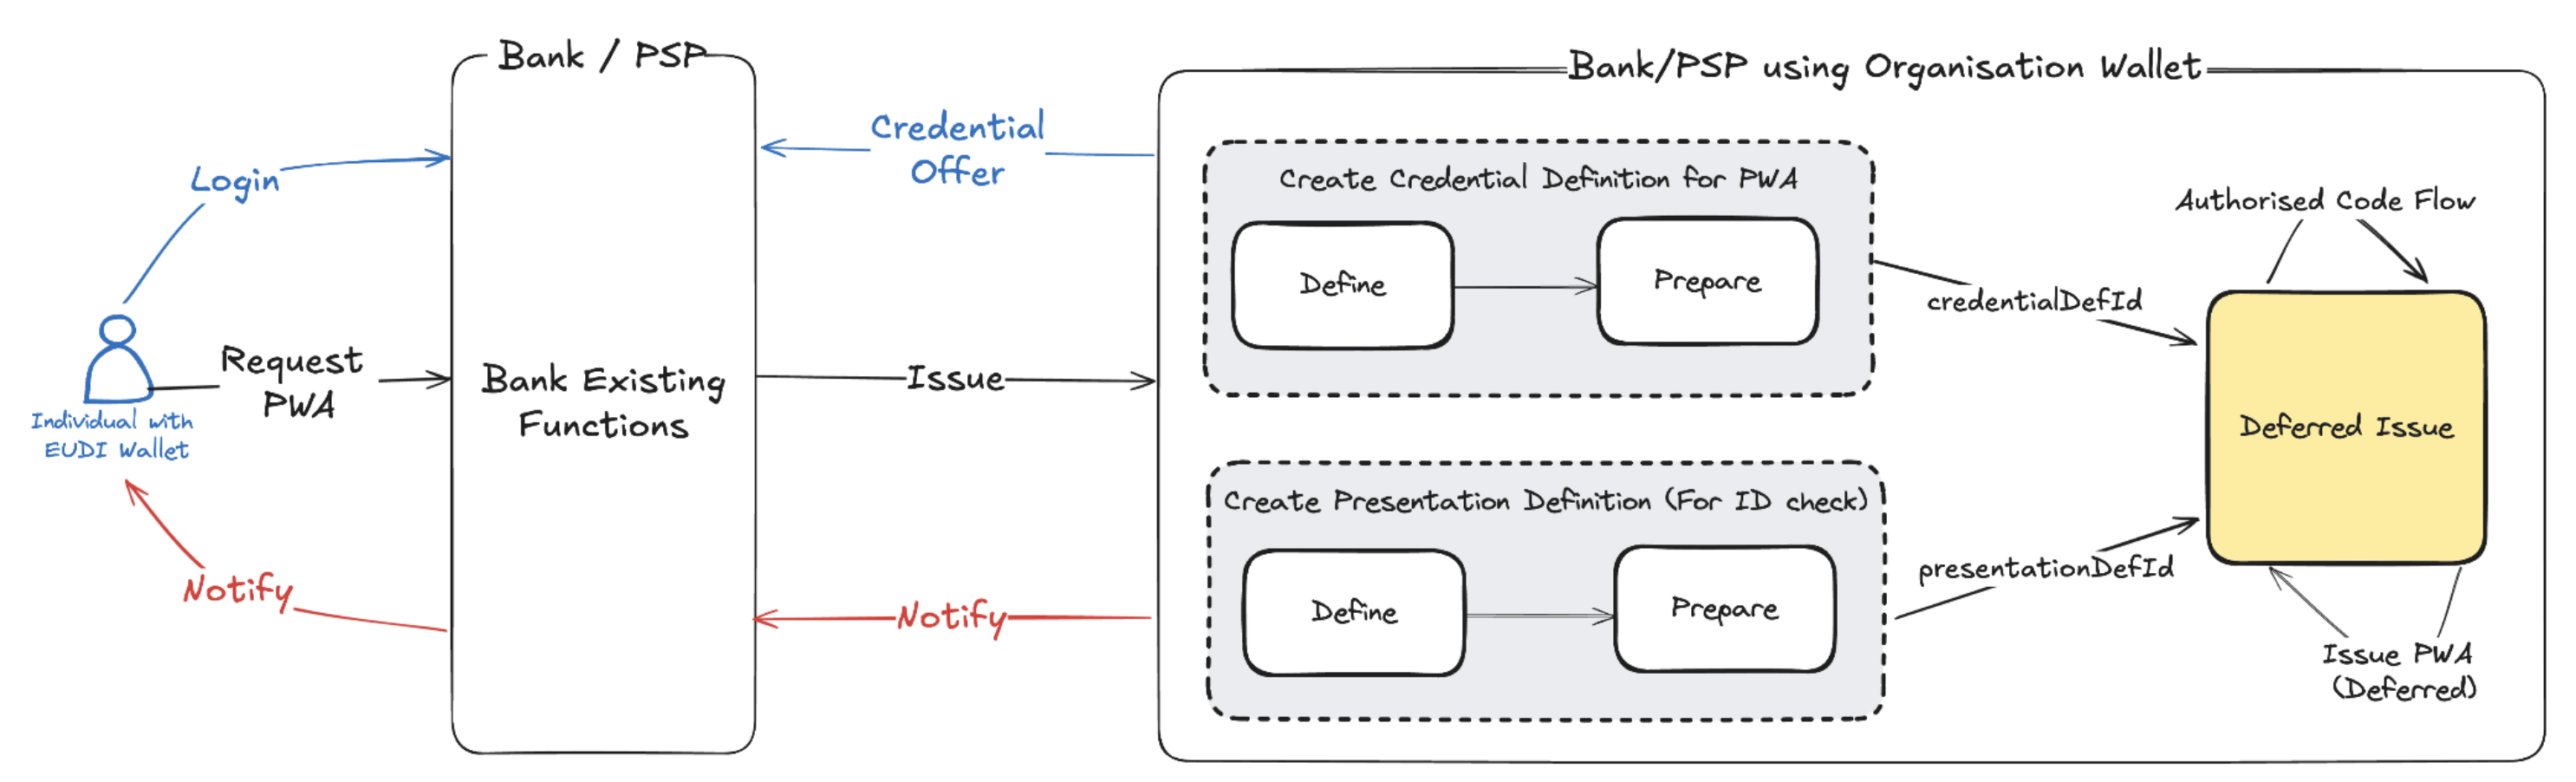
Step 1: Get the API Key (Bank Issuer Admin)
To obtain your API key, sign in to the dashboard and go to Account > Developer APIs > Create API Key (see Get API Keys). Once you have your API key, enter it in the field below and click the Set API Key button to save it for future use.
x509 key of your organisation: a key with a certificate chain. After you set the API key, the page fills in such a key. To choose another key, click the key label next to a signing key field in a request, for example cryptographicKeyIdentifier. To create a key, attach a certificate or see your keys, follow the key management guide. To add your certificate to the NXD trust list, see trust list registration.Step 2: Create Webhook (Bank Issuer Admin)
To create a webhook, you can run the code block below using the Run button. In the request payload, you must provide your webhook URL and a secret key:
<yourWebhookUrl>: This is the endpoint on your server that will receive real-time notifications about subscribed events, such as when the verifier receives a presentation (ows.verifier.verification.presentation_received).<yourSecretKey>: This is a secret key that you create. It is used to secure your webhook endpoint by allowing you to verify that incoming requests are genuinely from the iGrant.io platform.
Alternatively, you can manually copy the code block and use it in the body of the API request available here.
Request
Response
Step 3: Create Presentation Definition (Bank Issuer Admin)
To create a presentation definition for requesting proof, you can run the code block below using the Run button. Alternatively, you can manually copy the code block and use it in the body of the API request provided here.
From the API response, copy the presentationDefinitionId for use in Step 5.
Request
Response
presentationDefinitionId can be reused to issue multiple credentials (Step 5).Step 4: Create Credential Definition (Bank Issuer Admin)
To create a credential definition as per EWC RFC007, you can run the code block below using the Run button. Alternatively, you can manually copy the code block and use it in the body of the API request available here. From the API response, copy the credentialDefinitionId for use in Step 5.
The definition sets requiresInteractiveAuthorisation to true. Step 5 links the issuance history to the presentation definition from Step 3 (presentationDefinitionId), which the API allows only for a definition with this flag.
Request
Response
credentialDefinitionId can be reused to issue multiple credentials (Step 5).Step 5: Issue Credential (Bank Issuer)
When you run Steps 3 and 4 on this page, the credentialDefinitionId and presentationDefinitionId fields below are autofilled automatically (and updated whenever those steps are re-run). If you are executing the APIs yourself, replace <credentialDefinitionId> and <presentationDefinitionId> with the IDs obtained in the previous steps. The Bank Issuer issues the Payment Authenticator in the deferred mode after completing the necessary validations. As the issuance uses the Authorization Code Flow with a presentation from the holder, the request does not include preAuthorised. You can run the JSON code block below using the Run button.
After receiving the response, toggle the button provided to dynamically generate a QR code. The EUDI Wallet/Holder can then accept the credential offer using the Data Wallet (or any other EU Digital Identity Wallet) by either scanning the QR code or directly accessing the credential offer on their mobile device, such as via a browser.
Request
Response
From the API response, copy the credentialExchangeId of the issuance history (issuanceHistory[0].credentialExchangeId) for use in Step 6.
Alternatively, you can manually copy the code block, update the placeholders, and use it in the body of the API request available here. From the response received, copy offer.uri and generate a QR code using a QR code generator tool, or paste the response into our tool here. The EUDI Wallet/Holder can then accept the credential offer using the Data Wallet (or any other EU Digital Identity Wallet) by either scanning the QR code or directly accessing the credential offer on their mobile device (e.g., in a browser).
Step 6: Update the Credential Offer with the Claims (Bank Issuer)
When you run Step 5 on this page, the credentialExchangeId path parameter below is autofilled automatically (and updated whenever Step 5 is re-run). If you are executing the APIs yourself, use the credentialExchangeId from Step 5 as the path parameter. Upon receiving the ows.verifier.verification.presentation_received webhook event and completing the requisite identity mapping in the bank backend, send the claims of the issuance history (PUT /v4/config/ows/issuer/issuance-history/{credentialExchangeId}/claims) by running the code block below using the Run button.
Alternatively, you can manually copy the code block and use the credentialExchangeId from Step 5 as the path parameter in the API request available here.
Request
Response
Try It Yourself (With Demo Video)
Watch the below demo to learn Payment Authenticator issuance and try it out yourselves:
Payment Authenticator Demo: Learn how to issue Payment Authenticator using OpenID4VCI protocol with iGrant.io Digital Wallets.